[Spring] 30.SpringProject-댓글테스트

댓글 테스트
저번 장에서 댓글을 추가, 삭제, 목록을 조회하도록 ReplyController 를 만들고 테스트도 해보았습니다.
게시물 프로젝트에 적용하기 전에 먼저, Ajax에 대해 이해하기 위해 댓글 기능만 따로 테스트해보겠습니다.
먼저, HomeController 에 ajaxTest 메소드를 추가해주겠습니다.
//HomeController.java


package com.gguri.swp.controller;

...

/**
 * Handles requests for the application home page.
 */
@Controller
public class HomeController {

	private static final Logger logger = LoggerFactory.getLogger(HomeController.class);

	@RequestMapping(value = "/test", method = RequestMethod.GET)
	public String ajaxTest() {
		logger.info("Welcome home! Test!{}");

		return "test";
	}


	...
}
그 다음, test.jsp를 만들어보겠습니다!
<!-- test.jsp -->


<%@ taglib uri="http://java.sun.com/jsp/jstl/core" prefix="c" %>
<%@ page session="false" %>
<%@ page language="java" contentType="text/html; charset=UTF-8"
	pageEncoding="UTF-8"%>

<!doctype html>
<html lang="en">
<head>
	<meta charset="UTF-8" />
	<title>Document</title>
<link rel="stylesheet" href="/resources/test.css" /> <!-- test.css -->
</head>
<body>
	<h2 id = "h2-title" class="point">Ajax Test Page</h2>

	<!-- 댓글 목록 -->
	<ul id="replies">
	</ul>

	<!-- 페이지 번호 -->
	<ul id="pagination">
	</ul>

	<div>
		<div>
			작성자 : <input type="text" name="replyer" id="newReplyWriter" />
		</div>
		<div>
			내용 : <textarea name="replytext" id="newReplyText" cols="30" rows="3"></textarea>
		</div>
		<button id="btnReplyAdd" class="btn btn-primary">등록</button>
	</div>


<script src="/resources/plugins/jQuery/jQuery-2.1.4.min.js"></script>
<script src="/resources/test.js"></script> <!-- test.js -->
<script>
$(function(){
	listPage(1);
});
</script>
</body>
</html>
REST 방식을 이용하면 html을 먼저 보내놓고, 자바스크립트를 통해 이벤트를 기다린 다음 이벤트가 발생했을 때 Ajax 호출을 해서 기능을 구현한다고 했는데요~
댓글 목록과 페이지 번호는 Ajax를 이용해서 구현하므로 위와 같이 replies와 pagination이 비워져있습니다.
그리고 jQuery 문은 test.jsp에 그대로 쓰고 javascript 함수 부분과 css 부분은 test.js, test.css 에 따로 구현할 것입니다!

댓글 전체 목록 구현
목록을 구현하기 위해 다음과 같이 javascript를 추가해줍니다~!
//test.js


const BNO = 6;

function listPage(page){
	page = page || 1;
	listUrl = "/replies/all/" + BNO + "/" + page;

	sendAjax(listUrl, (isSuccess, res)=>{
		if(isSuccess){
			let data = res.list,
			pageMaker = res.pageMaker;
			let str = "";

			/*
			    $(data).each(function(d){
			    str += ...
			    }); 와 같음
			*/
			data.forEach(
			    (d) => {
				str += `<li data-rno= "${d.rno}" class= "replyLi">
				<span>${d.replytext}</span>
				<!-- 수정 버튼 -->
				<button onclick=modClicked(this) class="point">수정</button>
			        </li>`;
			    }
			);

			//test.jsp 비어있던 replies 함수에 목록을 추가
			$('#replies').html(str);
		}
	});
}

function sendAjax(url, fn,  method, jsonData){
	let options = {
			method: method || 'GET',
			url: url,
			contentType: "application/json"
	};
	//jsonData가 있을 때만 data : JSON.stringify(jsonData) 추가
	if(jsonData){
		options.data = JSON.stringify(jsonData);
	}

	$.ajax(options).always((responseText, statusText, ajaxResult) =>{
		let isSuccess = statusText === 'success'; //ajax 호출 성공 여부
		fn(isSuccess,responseText);
		if(!isSuccess){
			alert("오류가 발생하였습니다. (errorMessage:" + responseText + ")");
		}
	})
}
댓글 등록, 수정, 삭제 때도 ajax를 호출해야 하므로 sendAjax라고 따로 함수를 구현했습니다.
목록을 조회하는 것은 method 방식이 ‘GET’ 이므로 Ajax 호출시 GET 방식으로 호출함을 볼 수 있습니다.
그리고 좀 있다 구현할 댓글 수정, 삭제를 위해서 수정 버튼을 댓글마다 추가하고 onclick을 사용해서 버튼이 눌렸을 때 modClicked 함수를 호출하도록 만들었습니다.
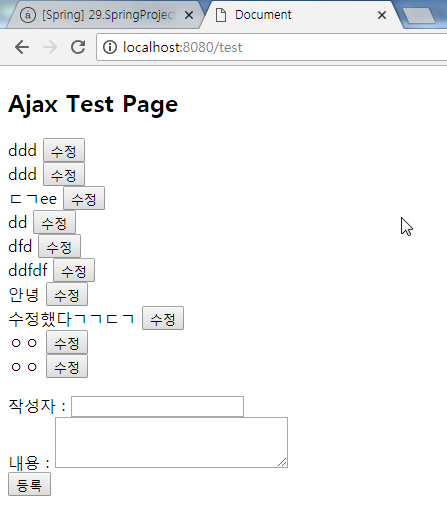
댓글 목록이 제대로 구현되었음을 알 수 있습니다.
등록 구현
다음은 등록 구현을 해보겠습니다!
test.jsp에 다음과 같이 추가해줍니다~!
//test.js


const BNO = 6;

...

function registerReply(){
	const REGIST_URL = "/replies";
	let $replyer = $('#newReplyWriter'),
		$replytext = $('#newReplyText');
	let jsonData = getValidData($replyer, $replytext);
	if(!jsonData){
		return;
	}

	jsonData.bno = BNO;

	sendAjax(REGIST_URL, (isSuccess, res) => {
		if(isSuccess){
			alert("등록이 완료 되었습니다.");
			$replyer.val('');
			$replytext.val('');
			listPage(1);
		}else{
			console.debug("Error on registerReply>>",res);
		}
	} , 'POST', jsonData);
}

function getValidData($replyer, $replytext){
	let errorFocus = null,
	replyer = $replyer.val(),
	replytext = $replytext.val(),
	errorMsg = "";

	if(!replyer){
		errorMsg = "작성자를 입력하세요.";
		$errorFocus = $replyer;
	} else if(!replytext){
		errorMsg = "내용을 입력하세요";
		$errorFocus = $replytext;
	}

	if(errorMsg){
		alert(errorMsg);
		$errorFocus.focus();
		return;
	}

	return {replyer: replyer, replytext: replytext};
}
등록은 ‘POST’ 방식으로 Ajax가 호출되었음을 알 수 있습니다. 그리고 getValidData 함수는 내용과 작성자가 입력되지 않았을 때 경고창을 띄워주고 모두 입력되었다면 JSON 데이터로 반환해주는 함수입니다!
그리고 등록이 완료되면 다시 listPage를 불러 전체목록을 불러옵니다!
test.jsp 에서는 jQuery를 사용해서 등록버튼을 누르면 registerReply 함수를 호출하게 해줍니다!
<!-- test.jsp -->


		...

		<button id="btnReplyAdd" class="btn btn-primary">등록</button>
	</div>

<script src="/resources/plugins/jQuery/jQuery-2.1.4.min.js"></script>
<script src="/resources/test.js"></script>
<script>
$(function(){
	listPage(1);

	$('#btnReplyAdd').click(function(){
		registerReply();
	})

});
</script>
</body>
</html>
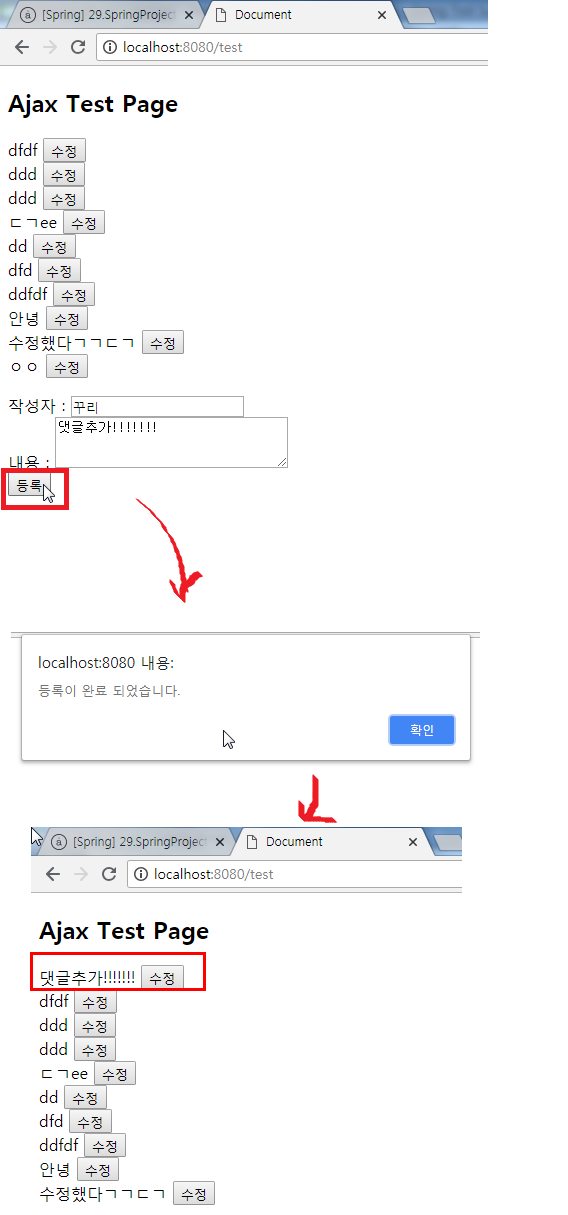
댓글 등록도 제대로 이루어지네요! 그리고 등록한 후 다시 목록을 그릴 때 REST 방식을 이용하니 페이지 전환(화면 깜빡임) 없이 매끄럽게 목록이 바뀌는 것을 볼 수 있습니다!
수정창
먼저, 삭제, 수정은 창을 띄워서 진행할 것이기 때문에 test.jsp에 modDiv 박스를 추가해줍니다!
<!-- test.jsp -->


	...

	<div id="modDiv">
		<div class="modal-title">
			<div>
				<input id="replycontext" rows="3" placeholder="Enter" oninput="replyContextChange()"></input>
			</div>
		</div>
		<div>
			<button onclick="editReply()" id="btnModReply">수정</button>
			<button onclick="removeReply()" id="btnDelReply">삭제</button>
			<button onclick="closeMod()" id="btnCloseReply">닫기</button>
		</div>
	</div>

<script src="/resources/plugins/jQuery/jQuery-2.1.4.min.js"></script>
<script src="/resources/test.js"></script>
<script>
$(function(){
	listPage(1);
	movCenterModDiv();
	$('#btnReplyAdd').click(function(){
		registerReply();
	})
});
</script>
</body>
</html>
위에 보시면 modDiv 박스에는 수정, 삭제, 닫기 버튼이 있고 모두 onclick을 이용해서 함수를 호출하고 있습니다.
그리고 replycontext를 보면 oninput 속성이 있죠?? oninput 속성은 replycontext의 내용이 변경이 있는 것을 감지합니다. 만약 내용 변경이 있다면 replyContextChange라는 함수를 호출합니다.
editReply, removeReply, closeMod , replyContextChange 함수는 이따가 구현하겠습니다!
그리고 modDiv 창에 css 속성 값을 넣어줍니다!
/* test.css */

#replies{
	padding:0;
}

.modal-title{
	margin-bottom: 10px;
}

.point{
	cursor : pointer;
}

#modDiv{
	width: 300px;
    height: 100px;
    position: absolute;
    background: gray;
    text-align: center;
    padding: 15px 10px 10px 10px;
    z-index: 1000;
    top: 50%;
    left: 50%;
    display:none;
}
그다음 댓글에 수정 버튼을 누르면 수정 창이 화면 가운데 뜨게 modClicked 함수와 movCenterModDiv 함수를 test.js에 추가합니다!
//test.js


const BNO = 6;

let workingReplyText ="",
	$workingReply = null,
	workingRno = 0;

    ...

function modClicked(btn){
	//수정 창 화면 가운데에 위치
	movCenterModDiv();

	let $btn = $(btn),
	$reply = $btn.parent(),
	rno = $reply.data('rno');

    //수정되기 전의 내용을 수정창에 보여줌 (공백 제거)
	replytext = truncSpace($reply.find('span').text());
	$('#replycontext').val(replytext);

    //수정 창 나타나게 함
	$('#modDiv').show('slow');
	workingRno = rno;
	workingReplyText = replytext;
	$workingReply = $reply;
}

function movCenterModDiv(){
	$modDiv = $('#modDiv');
	$modDiv.css({'margin-left':$modDiv.width()/2*(-1)});
	$modDiv.css({'margin-top':$modDiv.height()/2*(-1)});
}

//공백 제거 함수
var truncSpace = function(str){
	if(!str){
		return "";
	}
	return str.replace(/[\n\r\t]/g,'').trim();
};
수정 버튼을 누른 해당 댓글의 번호와 댓글 내용, 댓글 li를 담아두기 위해 workingRno, workingReplyText, $workingReply를 전역변수로 선언했습니다.
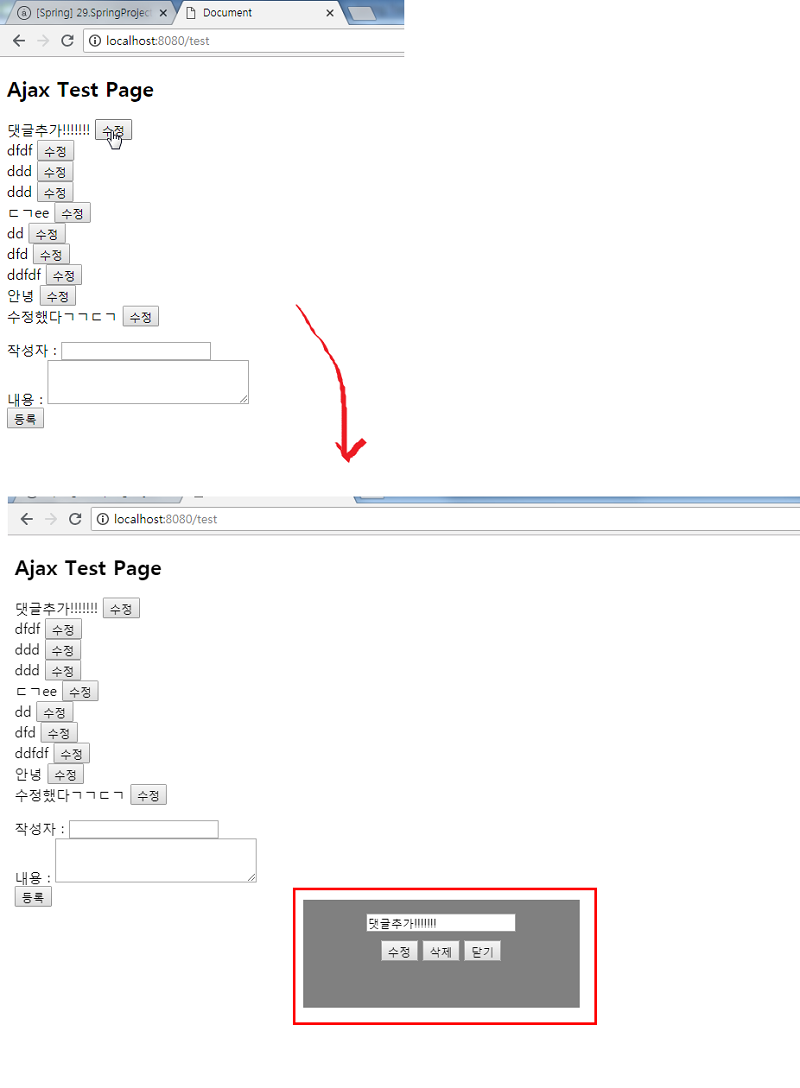
수정 창이 제대로 뜨는 것을 확인할 수 있습니다!
댓글 수정 기능 구현
이제 수정 창에서 수정 버튼을 누르면 수정이 되도록 구현해보겠습니다. 그리고 원래 내용에서 수정되지 않으면 수정버튼은 보이지 않고, 변경이 있어야 수정버튼이 나오게도 구현하겠습니다.
일단 수정 창의 수정버튼을 숨겨놓겠습니다!
/* test.css */


...

#btnModReply{
	display:none;
}
그리고 test.js에 다음과 같이 추가해줍니다!
//test.js
const BNO = 6;
let workingReplyText ="",
$workingReply = null,
workingRno = 0;
...
function editReply(){
let editedReplyText = $('#replycontext').val();
let jsonData = { replytext: editedReplyText };
sendAjax("/replies/"+workingRno, (isSuccess, res) =>{
if(isSuccess){
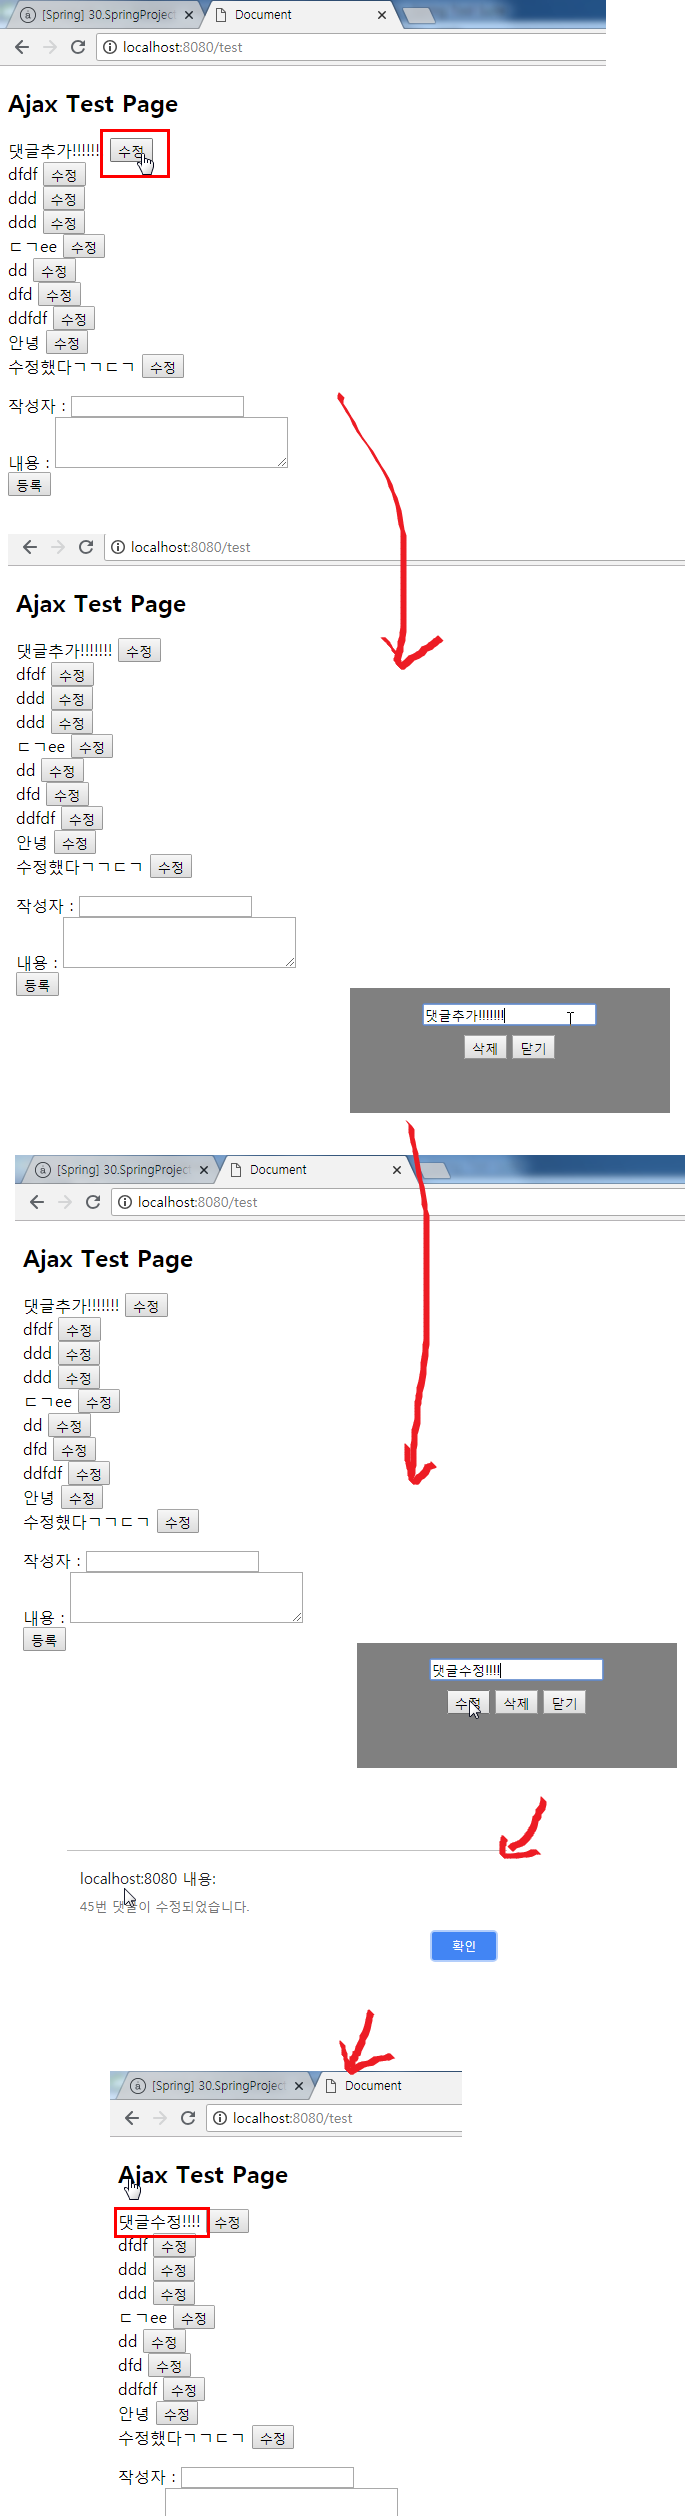
alert(workingRno+"번 댓글이 수정되었습니다.");
$workingReply.find('span').text(editedReplyText);
closeMod();
}else{
console.debug("Error on updateReply>>", res);
}
},'PUT',jsonData);
}
//내용이 변경되지 않으면 수정 버튼 안 나타남
function replyContextChange(){
if($('#replycontext').val() !== workingReplyText){
$('#btnModReply').show();
}else{
$('#btnModReply').hide();
}
}
수정을 할 때 메소드 방식은 ‘PUT’임을 확인 할 수 있습니다~!
그리고 수정 창 닫기 기능도 활성화 시켜주겠습니다!
//test.js

...

function closeMod(){
	let $modDiv = $("#modDiv");
	workingRno = 0;
	workingReplyText ="";
	$workingReply = null;
	$('#replycontext').val('');
	$modDiv.hide('slow');
	$('#btnModReply').hide();
}
수정 창을 닫을 때 전역변수도 기본 값으로 초기화 시켜주겠습니다!
댓글 삭제 기능
이제 삭제 기능도 구현해주겠습니다~! test.js에 다음과 같이 추가해줍니다!
//test.js
let workingPage = 0; //삭제 후에도 현재 페이지에 그대로 있음(페이징 처리 후에 적용하세요~)
...
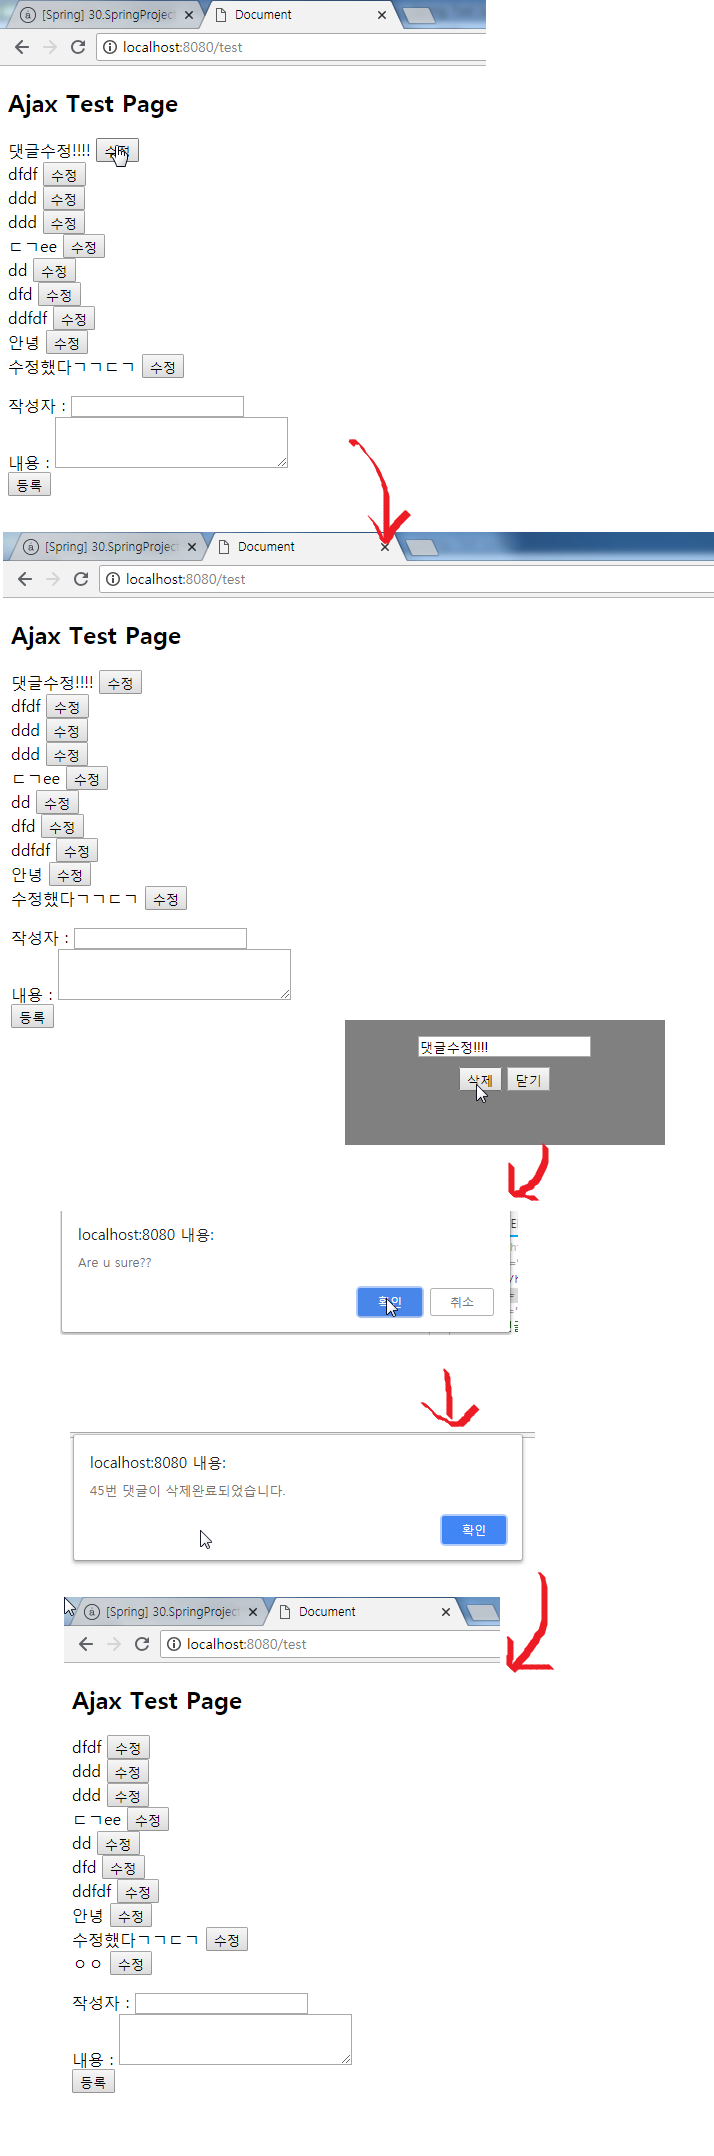
function removeReply(){
if(!confirm("Are u sure??")) return;
sendAjax("/replies/"+workingRno, (isSuccess, res) => {
if(isSuccess){
alert(workingRno+"번 댓글이 삭제완료되었습니다.");
workingPage = $('.active').data().page; //삭제 후에도 현재 페이지에 그대로 있음(페이징 처리 후에 적용하세요~)
listPage(workingPage);
closeMod();
} else{
console.debug("Error on removeReply>>",res);
}
}, 'DELETE');
}
삭제 일 때는 DELETE 방식으로 Ajax를 호출했습니다~!
페이징 처리
마지막으로 댓글 목록에 페이징 처리를 해주겠습니다~!
test.js에 페이지 번호를 그려주는 printPage 함수를 추가해줍니다
그리고 listPage에서 printPage 함수를 호출해줍니다~!
//test.js
function listPage(page){
...
sendAjax(listUrl, (isSuccess, res)=>{
if(isSuccess){
...
printPage(pageMaker);
}
});
}
function printPage(pageMaker){
let str = "";
tempPage = 0;
if(pageMaker.prev){
tempPage = pageMaker.startPage - 1;
str = `<li><a href="#" onclick="listPage(tempPage)" data-page="${tmpPage}"><<</a></li>`;
}
//현재 페이지
let currentPage = pageMaker.cri.page;
for(let i = pageMaker.startPage; i <= pageMaker.endPage; i++){
str += `<li><a href="#" onclick="listPage(${i})" class="${currentPage === i ? "active" : ""}" data-page="${i}">${i}</a></li>`;
}
if(pageMaker.next){
tempPage = pageMaker.nextPage +1;
str += `<li><a href="#" onclick="listPage(tempPage)" data-page="${tempPage}">>></a></li>`;
}
$('ul#pagination').html(str);
}
그리고 css 속성도 추가해주겠습니다~!
#pagination>li{
	list-style: none;
	display: inline;
}

#pagination>li>a{
	margin: 10px;
	text-decoration:none;
}

#pagination a.active{
	font-weight:700;
	border: 1px solid blue;
	padding: 4px 8px;
}
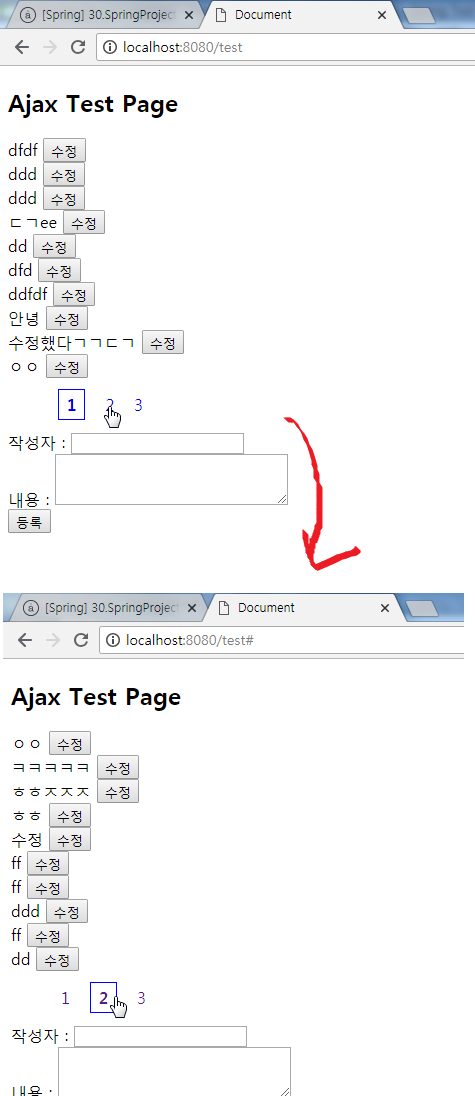
페이징 처리도 제대로 되었습니다~!
지금까지 댓글 처리를 Ajax를 이용해서 구현해보았는데요~! Test 였지만 엄청 길었네요 ㅋㅋㅋ
다음 장부터는 원래 게시물 프로젝트에 댓글 기능을 추가해보겠습니다~!

배움은 의무도 생존도 아니다